
Shower Waterproofing: Systems and Common Failures

Shower waterproofing is the continuous water-control system behind the tile and around the shower base. It connects the walls, floor, corners, penetrations, and drain so water stays out of the surrounding building materials. Tile, grout, and a bead of caulk cannot provide that protection on their own.
The main options are a traditional shower pan liner, a bonded sheet membrane, a liquid-applied membrane, or waterproof building panels used with a compatible shower base. Each can be part of a suitable assembly. The choice depends on the drain, substrate, layout, product requirements, and installation details, with particular attention to how all the parts connect.
This guide covers residential tiled showers in the United States. It explains how to compare systems, identify vulnerable connections, and review the work before tile conceals it. Product instructions and locally adopted requirements determine the details for an actual installation.
What Actually Makes a Shower Waterproof?
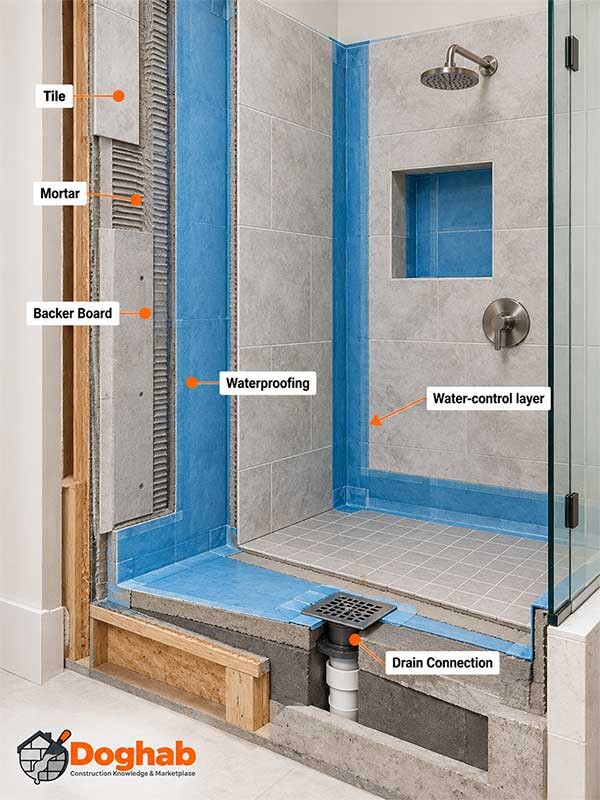
A tiled shower has several layers with different jobs. The tile provides the finished surface. Setting mortar bonds it to the surface beneath. Backer board or another approved substrate supports the installation. The waterproofing layer controls water that reaches it.
Even low-absorption tile does not make the joints, corners, pipe openings, and drain connection watertight. TCNA specifically cautions that grout joints are not waterproof and that wet areas need an appropriate installation method and substrate. (1)
Choose finishes for their intended use, but keep that decision separate from water management. Our guide to types of tile explains the material-selection side.
Water-Durable Backer Board Is Not the Same as Waterproofing
Conventional cement board can tolerate wet conditions without providing a waterproof barrier. USG, for example, describes Durock cement board as water-durable but not waterproof. The complete shower assembly still needs a suitable method of protecting moisture-sensitive materials behind it. (2)
That protection may be a bonded membrane on the shower side or a correctly detailed barrier behind the board in a traditional wall assembly. Its location and connection to the shower base must follow the selected method.
Purpose-made waterproof panels are different. Their waterproof core or facing does not automatically seal the joints, fasteners, corners, or penetrations. Those connections require the manufacturer's specified treatment. Johns Manville makes this distinction explicitly for GoBoard. (3)
Ordinary drywall should not be treated as a generally interchangeable shower substrate. Some proprietary membrane systems allow it within their specified assemblies; other products restrict it to dry areas. Approval for one combination does not establish approval for another. (4, 5)
Comparing Shower Waterproofing Systems
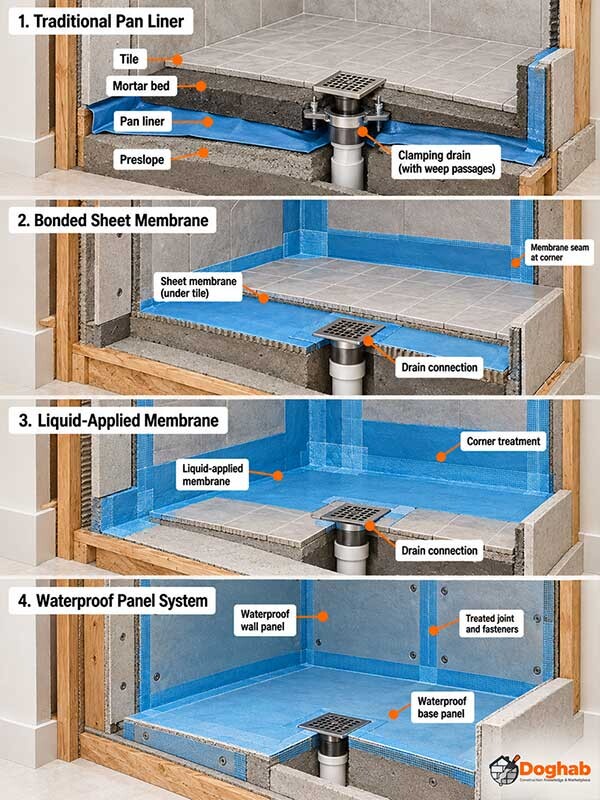
Start by asking where the waterproofing sits and how it connects to the drain.
| System | How it manages water | Main installation concern |
|---|---|---|
| Traditional pan liner | A liner beneath the floor mortar bed directs water to a compatible clamping drain | Preslope, liner continuity, and open weep passages |
| Bonded sheet membrane | A sheet directly beneath the tile-setting layer connects to an approved drain detail | Bonding, seams, corners, and penetrations |
| Liquid-applied membrane | A coating cures into a continuous membrane over an approved substrate | Thickness, coverage, curing, and connection details |
| Waterproof panel system | Waterproof boards and compatible base components form the assembly after their connections are sealed | Joints, fasteners, base transitions, and drain integration |
These are assembly approaches, not a ranking of product quality. Some manufacturer-designed systems combine components from more than one category.
Narrow the options by checking the available floor depth, drain location, approved substrate, shower geometry, and the installer's ability to document the complete method.
Traditional Shower Pan Liners
In a conventional mortar-bed shower floor, a PVC or CPE liner sits over a sloped supporting layer. A separate mortar bed and the tile finish sit above it.
Some water can reach the mortar bed through the tiled surface. The liner directs that water toward the drain's weep passages—small drainage routes below the visible grate. A liner laid flat, or a drain with blocked weep passages, interferes with that drainage. (6)
The wall water-management layer must connect correctly to the pan arrangement. A waterproof floor liner does not resolve an unprotected wall, a poorly formed curb corner, or an opening around a pipe.
This approach can accommodate a custom mortar base, but the installer must understand the concealed drainage path. It also requires planning for the depth of the complete floor assembly.
Bonded Sheet Membranes
Bonded sheet membranes place waterproofing immediately beneath the tile-setting layer, over an approved wall substrate, sloped mortar base, or compatible tray.
The sheet's thickness is manufactured into the product. On site, the critical work is bonding it properly and completing the seams, corners, and connections. A sheet with an open seam does not form a continuous barrier.
Seaming methods are product-specific. For example, Schluter's KERDI instructions specify a 2-inch overlap or an appropriately banded joint. That measurement should not be copied onto another membrane without checking its instructions. (4)
Sheet systems are useful when the design calls for surface waterproofing and documented drain connections. Complex niches and corners still require careful detailing; a factory-made sheet does not remove that work.
Liquid-Applied Membranes
Liquid membranes are applied over an approved substrate and cure into a waterproof layer. They can conform to irregular shapes without cutting sheets, but the installer creates their thickness on site.
A surface that looks fully colored may still contain thin spots, pinholes, or incomplete coverage. The application must meet the product's specified coverage and thickness, with the required treatment at joints and penetrations.
Requirements vary even between products from one manufacturer. The number of coats, reinforcement, substrate preparation, and waiting time cannot be borrowed from a different coating. CUSTOM's RedGard documentation, for example, distinguishes general waterproofing from shower-pan applications. (5)
Compare liquid systems by their approved use and inspection requirements. “Two coats” alone is not enough information to establish that a particular installation meets its specification.
Waterproof Panels and Prefabricated Bases
Waterproof building panels can provide both the tile backing and the water-control layer. Preformed shower trays can establish the floor shape, subject to the product's support, sizing, and installation requirements.
The assembly still depends on sealed panel joints, treated fasteners, wall-to-base transitions, and the specified drain connection. Do not assume every foam tray arrives waterproof or that every panel uses the same sealant or seam tape. (3, 7)
Check the tray's dimensions, drain location, permitted trimming, and tile limitations before buying it. A kit is most useful when its components fit the actual layout.
A ready-finished acrylic or other manufactured shower base is a separate option. It replaces the tiled floor assembly, but the wall-to-base flange and plumbing connections still need the base manufacturer's prescribed details.
The Connections That Need the Most Attention
Large, uninterrupted surfaces are only part of the system. Follow the waterproofing through every change in material, direction, or geometry.
The Drain Connection
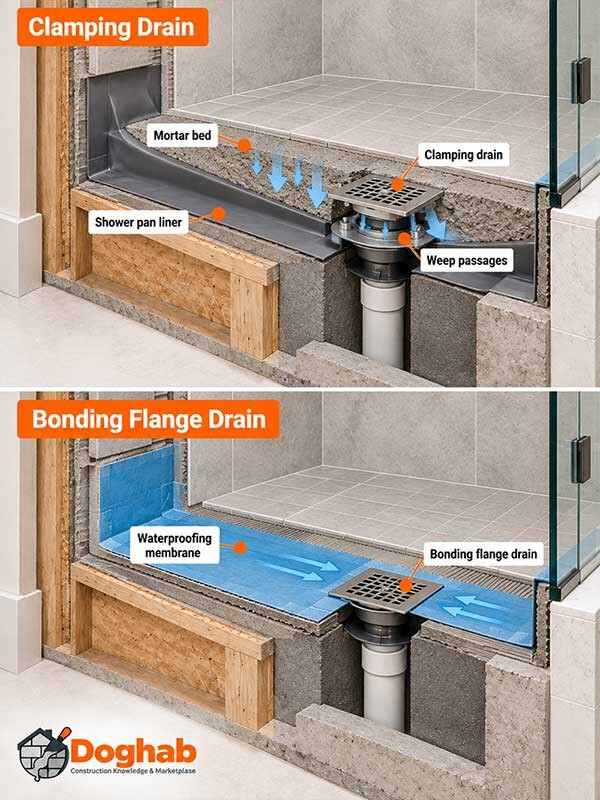
The membrane and drain must have a documented way to connect.
A traditional liner normally uses a compatible clamping drain and weep passages. A bonded system may use a drain with an integrated bonding flange—a surface designed to connect to the membrane near the top of the assembly. Schluter's KERDI-DRAIN is one example. (6, 8)
A linear drain describes the drain's shape, not its waterproofing method. Select its connection detail along with the membrane.
An existing clamping drain does not automatically suit a new bonded membrane. Use a manufacturer-supported adapter or other documented assembly when converting between methods. Caulking an improvised connection is not a substitute.
Slope at the Waterproofing Layer
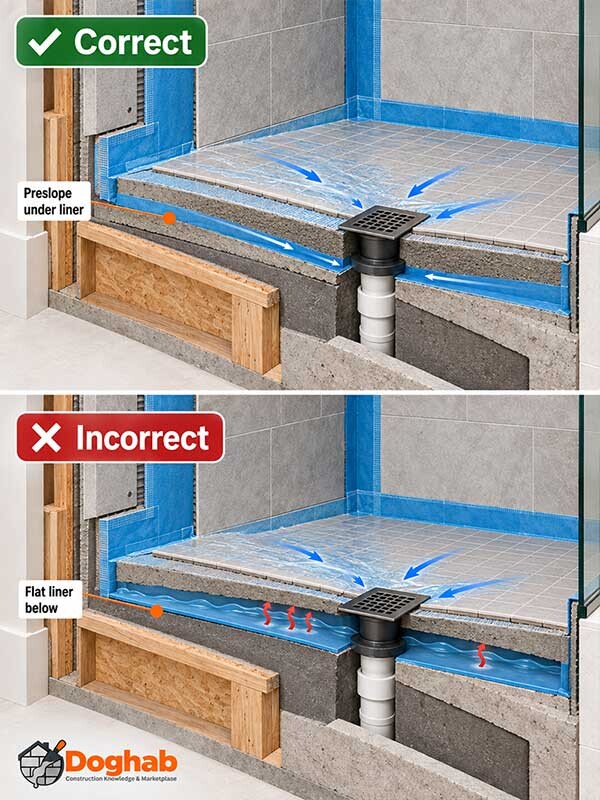
Water needs a route to the drain at the layer that contains it.
For a traditional liner, that means a preslope beneath the liner. For a bonded membrane, the supporting shower base establishes the drainage slope before waterproofing. Sloping only the finished tile does not correct a flat water-control layer below it.
Oatey's liner installation guide specifies a preslope of 1/4 inch per foot toward the drain. This is a manufacturer instruction for that assembly; the applicable system details and local requirements govern your project. (9)
Benches, niche bottoms, and curb tops also need drainage toward the shower where specified. Review the underlying shape before the finish is installed; a flat waterproofed shelf is not corrected simply by tilting the tile above it.
Corners, Curbs, Benches, and Niches
Every added feature introduces more transitions. A niche has inside corners and a connection to the surrounding wall. A bench needs continuous waterproofing across its seat and adjoining surfaces. A curb needs a complete connection to the floor and walls.
Look for the system's prescribed corner pieces, bands, reinforcement, or sealant details. Tile trim and a neatly grouted edge do not demonstrate that the concealed transition is waterproof.
Plan shower-door and accessory attachments before tiling. Fasteners added later can penetrate a completed membrane, so their location, support, and sealing detail need to be resolved as part of the installation.
Pipes, Mixing Valves, and Base Flanges
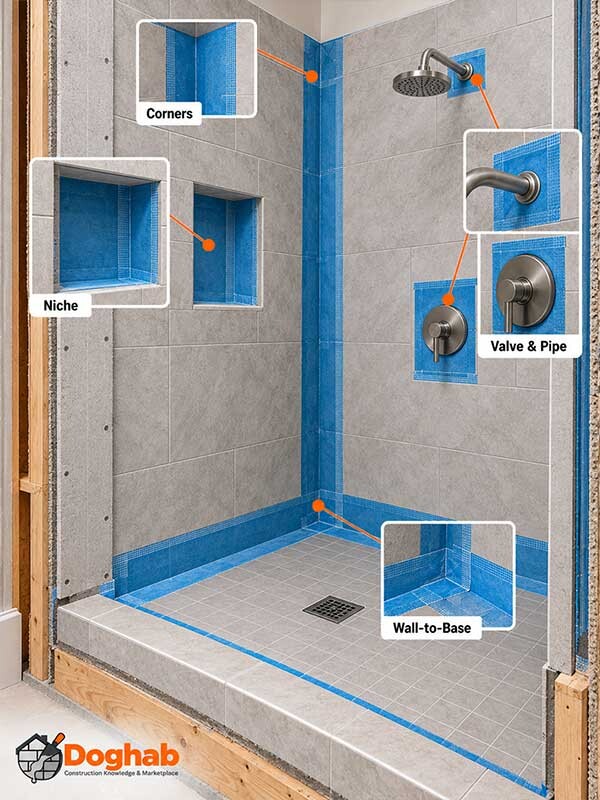
Showerheads, body sprays, and mixing valves interrupt the wall assembly. The waterproofing must terminate around these openings using approved collars, sealants, or other specified details.
A decorative cover plate is not proof that the concealed opening is sealed. Where tiled walls meet a manufactured shower base or tub, the wall waterproofing must connect to its flange rather than simply stopping nearby. (10)
Movement Joints and Compatible Materials
Changes of plane and other designated movement joints need an appropriate movement-accommodation detail. Rigid grout should not be substituted for the specified flexible joint or movement profile.
TCNA explains that tile and its substrate can expand and contract differently. The visible movement joint and the waterproofing connection beneath it perform related but separate jobs. (1, 11)
Likewise, mortar, seam tape, sealant, and membrane must be compatible with their intended substrates and with each other. A more expensive adhesive is not automatically suitable.
Our guide to choosing tile mortar explains how membrane compatibility affects adhesive selection and why modified or unmodified labels alone do not settle the choice.
Using a documented system makes compatibility easier to verify. Mixed components need written technical support for the actual connection, not just a claim that both products are waterproof.
Curbless Showers and Steam Showers Need Additional Planning
Curbless Showers
Removing the curb changes how water is contained at the entrance. Floor elevations, drainage slope, drain position, spray direction, and the surrounding bathroom floor become part of the same design problem.
The waterproofing must extend and terminate according to the selected curbless detail and expected water exposure. A glass screen can help manage splash, but it does not replace the membrane connection across the entrance.
Resolve floor recesses and structural constraints before ordering a tray. A curbless appearance also does not, by itself, establish compliance with accessibility requirements.
For testing, an open entrance may need a temporary, removable containment detail that does not damage the membrane. (12)
Steam Showers
A steam shower requires control of water vapor as well as liquid water. Waterproofing performance alone does not establish suitability for a steam enclosure.
Use an assembly specifically approved for the expected steam exposure, including its walls, ceiling, joints, and penetrations. Intermittently used residential steam showers and continuously operated steam rooms can have different product requirements. Schluter, for example, distinguishes KERDI applications from those requiring KERDI-DS. (4, 10)
Do not add extra barriers simply because more layers sound safer. Their placement should follow the specified assembly and the building's moisture-control design.
What to Check Before Tile Covers the Waterproofing
The useful inspection window is before the membrane and its connections disappear behind the finish.
First, confirm the exact products and assembly. Then check the substrate, drainage geometry, membrane continuity, and curing conditions. Photograph the drain connection, corners, niche, curb, and wall-to-base transitions while they remain visible.
For sheet membranes, inspect bonding and the required seams or overlaps. For liquid products, verify the application against the specified thickness and coverage rather than color alone. For waterproof boards, inspect every required joint and fastener treatment.
A visual check is followed by the applicable water test. Neither should be replaced by a photograph of a finished tile surface.
Separate Curing Time From Test Duration
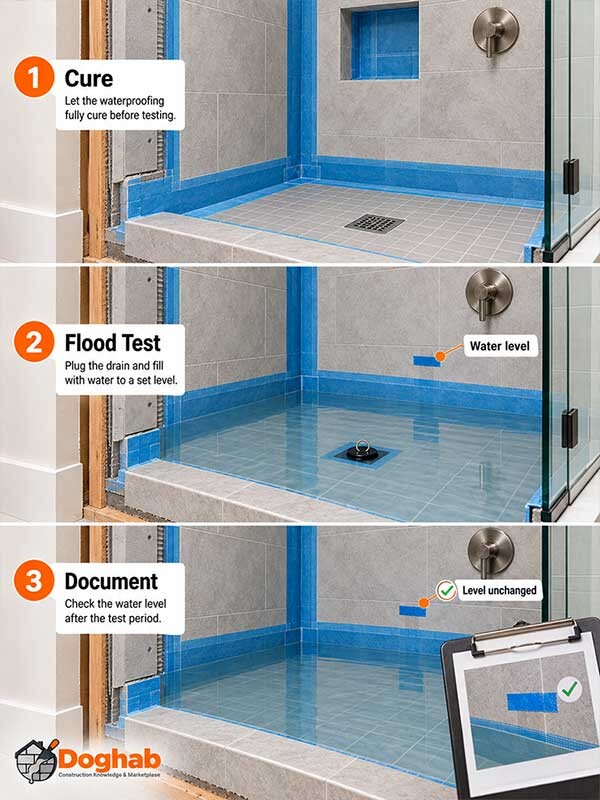
Curing time is the wait before testing. Test duration is how long the assembly holds water during the test.
Schluter recommends waiting at least 24 hours after installing KERDI before water testing under normal curing conditions. Its guidance describes 24 hours as a typical test duration. Those are two separate periods. (12)
Other products use different criteria. LATICRETE's published instructions, for example, give different waiting periods for its liquid and sheet membranes and adjust them for conditions. A product advertised as ready for testing in two hours does not necessarily require only a two-hour test. (13)
Use the current instructions for the exact product together with the inspection requirements applicable to the project. Do not shorten the schedule by transferring a faster product's timing to a different system.
What a Flood Test Can—and Cannot—Show
A correctly arranged flood test checks the waterproofed area holding the test water. The test setup needs to include the relevant drain connection and contain water without damaging the assembly.
The installer should document the initial water level, test period, observations, and result. If the level changes, possible plug leakage and evaporation need to be considered as well as membrane leakage. Repairs require another test. (14)
A passed pan test does not verify every wall penetration, plumbing supply connection, or location above the test waterline. It also cannot account for damage caused later by tile installation or hardware attachments. Protecting the tested membrane remains necessary.
Common Shower Waterproofing Failures
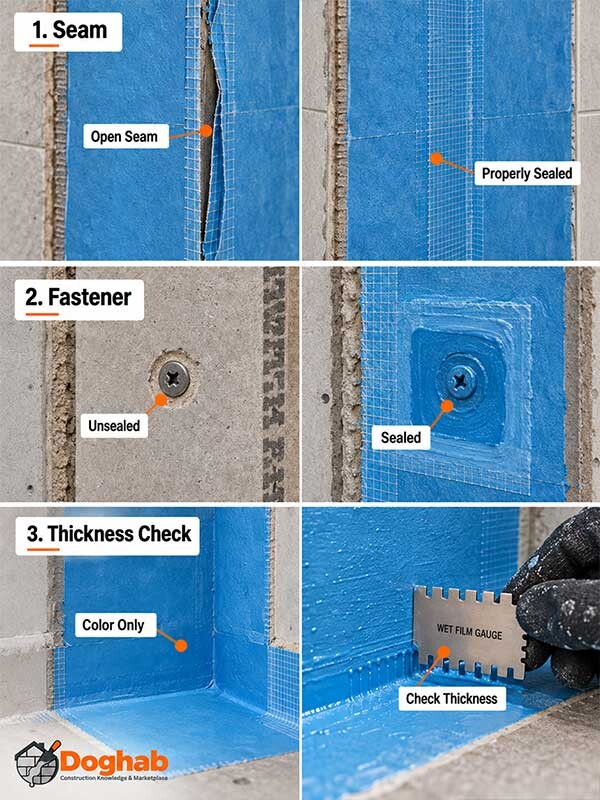
The following are failure mechanisms to check, not a statistical ranking of how often they occur.
Missing or interrupted waterproofing. A protected floor does not compensate for an unconnected wall layer. The same applies to an untreated niche, bench, or pipe opening.
A liner without a preslope. Water reaching a traditional floor liner needs a drainage path beneath the mortar bed. A flat liner can retain water even when the tile above slopes toward the grate. (6, 9)
Blocked weep passages. Mortar, debris, or excess sealant can obstruct a traditional drain's concealed drainage routes. The visible drain may still take surface water while the underlying bed drains poorly. (6)
Thin or defective liquid coverage. Pinholes, voids, missed areas, and insufficient film thickness interrupt the membrane. Applying the correct amount and inspecting between stages matters more than achieving a uniform-looking color. (5, 13)
Incomplete seams or fastener treatment. Open sheet seams, poorly detailed corners, and untreated penetrations can break continuity. Waterproof board does not make an unsealed screw location waterproof. (3, 4)
Unsupported combinations or later punctures. An improvised drain transition, incompatible sealant, or attachment through the membrane can undermine an otherwise appropriate system. Resolve the detail before covering or drilling it.
Testing too early—or covering the work without testing. Cure requirements and testing belong in the schedule. Skipping them removes an opportunity to identify defects while the waterproofing is accessible.
A Shower Leak Does Not Automatically Mean the Pan Has Failed
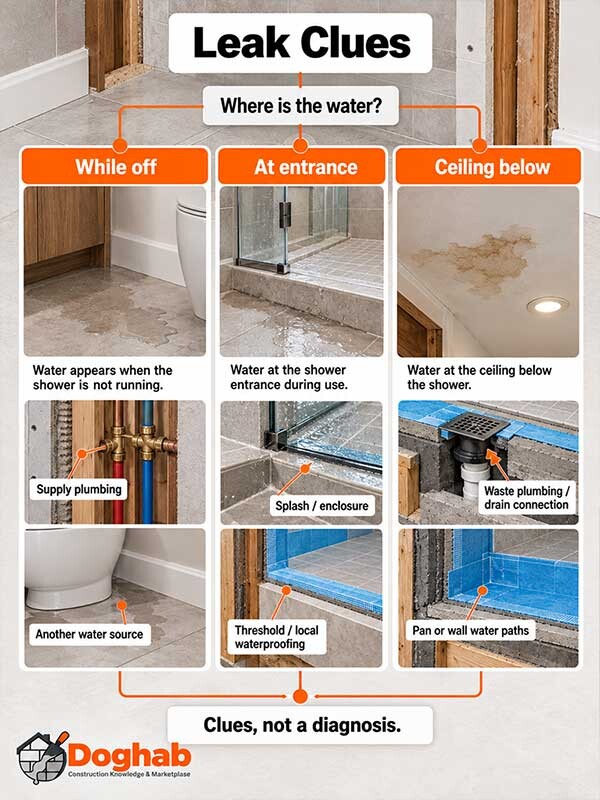
Water outside the shower may come from the waterproofing, plumbing, the enclosure, or another moisture source. The visible stain may be some distance from the entry point.
Use observations to guide an investigation rather than to declare a diagnosis:
| Observation | What to investigate |
|---|---|
| Leakage appears while the shower is off | Supply plumbing or another water source |
| Water appears near the entrance during use | Splash, enclosure seals, threshold, and local waterproofing details |
| A ceiling stain develops below the shower | Waste plumbing, drain connection, pan, and wall water paths |
| Grout repeatedly cracks or tiles move | Substrate movement, support, bonding, and movement joints |
| Grout remains dark or an odor persists | Cleaning residue, drying conditions, drainage, and concealed moisture |
These clues are not conclusive. For example, a ceiling stain cannot distinguish a leaking pipe from a membrane defect by itself.
Stop using the shower if it is causing active leakage into the building. A plumber can investigate supply and waste connections; a qualified tile or waterproofing professional can assess the tiled assembly. Soft floors, swelling, or visible deterioration warrant investigation before cosmetic repairs.
Repair or Rebuild?
A localized membrane defect may be repairable when the system can be identified, sound material is accessible, and the manufacturer provides a suitable repair detail. Before tiling, a properly executed patch can be easier to inspect and retest.
After tiling, access is more difficult. Removing tile can damage the membrane, and a durable repair needs enough sound surrounding material to restore the specified connection.
Broader reconstruction may be necessary when essential layers are missing, drainage geometry is wrong, underlying materials are damaged, or no reliable connection to the existing waterproofing can be established. The scope should follow the investigation.
Regrouting, replacing surface caulk, or applying grout sealer does not reconstruct a failed hidden membrane. Those measures address different parts of the installation. Our tile grout selection guide explains grout's role in the finished surface.
A Checklist for Reviewing a Shower Waterproofing Quote
Ask the contractor to identify:
- The complete assembly and exact waterproofing products.
- The substrate and any necessary repairs or preparation.
- The drain model and its connection to the waterproofing.
- How the base, curb, bench, and niche will drain.
- The treatment of corners, seams, fasteners, and pipe openings.
- Any curbless or steam-shower details.
- The curing schedule, test procedure, and required inspections.
- How door hardware and accessories will be attached.
- The records, product instructions, and warranty terms provided at handover.
A quote stating only “waterproof shower” leaves the most consequential details unresolved. Use this checklist to compare the scope of the work before comparing the final price.
Questions to Resolve for Your Specific Shower
How High Should Wall Waterproofing Extend?
Follow the selected assembly and actual water exposure, including hand showers and body sprays. Schluter specifies at least showerhead height for KERDI in showers and tub surrounds; that is a system instruction, not a universal rule for every product. Steam enclosures require their own enclosure-wide details. (10)
Can Waterproofing Be Applied Over Existing Tile?
Some membrane products list existing ceramic tile as a suitable substrate, but that does not establish that an existing shower is suitable for an overlay. The tile's bond, underlying condition, surface preparation, elevations, and connection to the drain must all be assessed. Covering an unresolved leak can conceal the problem. (5)
How Long Should Shower Waterproofing Last?
There is no single reliable service-life figure for all shower systems. Product selection, detailing, installation, movement, later damage, and use affect performance. A warranty period should not be presented as a guaranteed lifespan for every part of the shower.
Sources and Scope
Reviewed September 24, 2026. This guide draws on manufacturer instructions and tile-industry guidance; it does not report a Doghab field test or certify a specific installation.
- Tile Council of North America — Ceramic Tile FAQ.
- USG — You Asked, We Answered: Top 10 FAQs from 2023.
- Johns Manville — GoBoard product and installation information.
- Schluter — KERDI product and installation instructions.
- CUSTOM Building Products — RedGard Technical Data Sheet, TDS-104, February 14, 2025.
- Oatey — Shower Installation and Waterproofing: Tips & Common Errors.
- Schluter — KERDI-SHOWER-KIT-FLG product information.
- Schluter — KERDI-DRAIN product information.
- Oatey — How to Install a Shower Pan Liner.
- Schluter — KERDI-DS product information and installation guidance.
- Tile Council of North America — Movement Joint Placement FAQ.
- Schluter — What Is a Water Test?
- LATICRETE — Waterproofing technical FAQs.
- LATICRETE — Flood Testing Procedures, TDS 169.