
Tile Mortar and Adhesives: Types and How to Choose

Choosing tile mortar starts with three questions: what tile are you installing, what surface will it bond to, and what conditions will the finished installation face? A product needs to suit all three. “For porcelain,” “high strength,” or “ready to use” on the package does not answer the whole question.
Cement-based thinset mortar, premixed organic adhesive, and epoxy adhesive serve different purposes. Even within one category, products have different substrate approvals, tile-size limits, working times, and exposure restrictions.
This guide explains the main options for residential tile projects in the United States, how to read their specifications, and which installation mistakes can undermine an otherwise suitable choice.
Tile Mortar, Adhesive, and Grout Have Different Jobs
Tile adhesive is a broad term for the material that bonds tile to the surface underneath. In U.S. installation guidance, that material may be a cement-based thinset mortar, an organic adhesive commonly called mastic, or a specialty adhesive such as epoxy.
Grout fills the joints between tiles. It does not replace the bonding material underneath them. Our tile grout selection guide explains that separate choice.
Waterproofing has another role. In a shower, a compatible mortar bonds the tile, while the specified waterproofing assembly controls water. Selecting an adhesive approved for wet areas does not, by itself, make the shower waterproof.
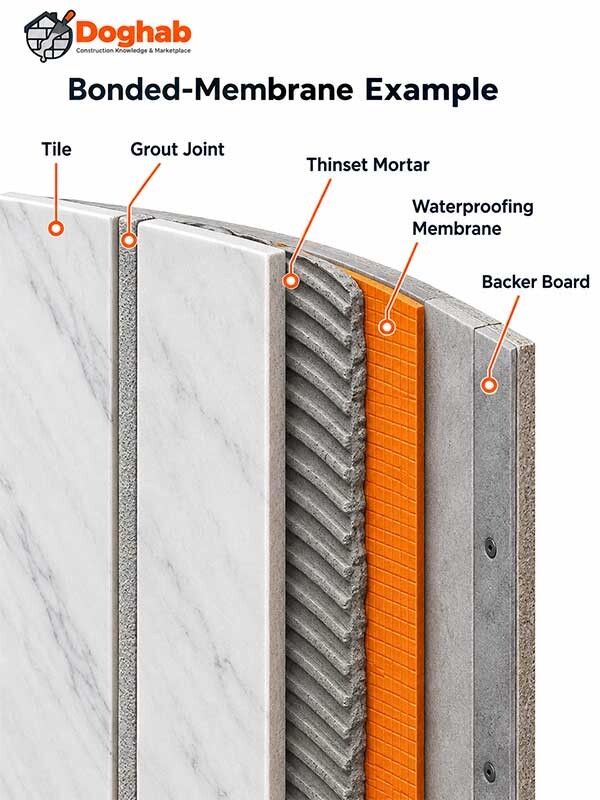
Also distinguish tile-setting mortar from a mortar bed. A mortar bed forms part of the supporting assembly; the setting material bonds the tile. Products intended for those jobs are not automatically interchangeable.
The Main Types of Tile Mortar and Adhesive
Start with the material category, then check the exact product.
| Material | Where it may fit | Main selection issue |
|---|---|---|
| Cement-based thinset mortar | Many ceramic and porcelain wall and floor installations | Tile, substrate, membrane, and exposure compatibility |
| Premixed organic adhesive, often called mastic | Approved interior applications, including some smaller wall tiles | Tile size, drying conditions, and wet-area restrictions |
| Epoxy tile adhesive | Certain moisture-sensitive or resin-backed materials and specialty applications | Exact material approval, component mixing, and working time |
Large-and-heavy-tile mortar, rapid-setting mortar, and non-sag mortar describe additional product characteristics. They are not necessarily separate adhesive chemistries.
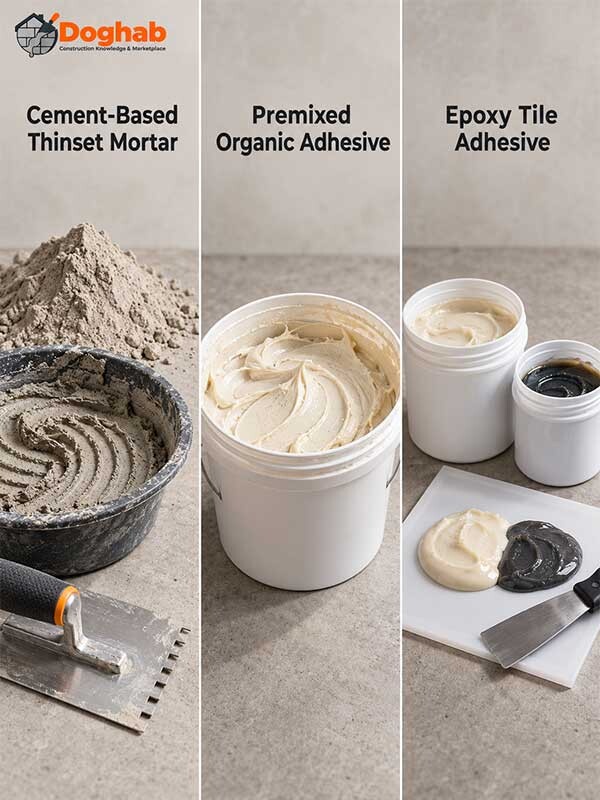
Cement-Based Thinset Mortar
Cement-based thinset usually comes as powder mixed with water or a specified liquid additive. It forms the bond between the tile and the approved surface beneath it.
Two common categories are unmodified and modified mortar:
Unmodified dry-set mortar generally contains Portland cement, sand, and water-retention ingredients.
Modified mortar includes polymers, either already blended into the powder or introduced through a specified liquid additive.
Those descriptions identify composition; they do not establish which product suits your installation. A mortar may have the required performance classification yet still be unsuitable for a particular membrane, tile backing, or exposure. (1)
Use only the mixing liquid specified for the product. Adding a separate latex additive to a mortar designed for water alone changes the formulation.
Large-and-Heavy-Tile Mortar
Large-and-heavy-tile mortar, often abbreviated LHT, is formulated to support the intended tile within a specified mortar thickness. Depending on the product, it may also provide resistance to tile settling on floors or slipping on walls.
These properties matter when tile size, weight, or backing geometry makes installation more demanding. However, an LHT label does not authorize unlimited thickness or turn the mortar into a floor-leveling compound.
Check the permitted thickness after the tile is embedded, along with the tile and substrate requirements. Correct substantial flatness problems before setting tile. (2)
Premixed Organic Adhesive, or Mastic
Premixed organic adhesive can be convenient because it does not require mixing powder and water. That convenience comes with application limits.
Read the restrictions for tile dimensions, substrates, moisture exposure, and drying. A product approved for a small ceramic backsplash tile may not suit a large porcelain tile or the same tile installed over a waterproof membrane.
Wet-area approval needs particular care. For example, CUSTOM’s AcrylPro permits certain intermittent wet applications, including shower walls, but excludes shower floors, steam rooms, and installation over nonporous waterproof membranes. Approval for one shower-wall assembly therefore does not establish approval for every shower wall. (3)
Do not identify the material by its marketing name alone. CUSTOM’s SimpleSet “Pre-Mixed Thin-Set Mortar,” for example, lists ANSI A136.1 Type I, an organic-adhesive classification. The wording on the front of a container is not a substitute for its technical data sheet. (4)
Epoxy Tile Adhesive
Epoxy tile adhesives use reactive components mixed according to the manufacturer’s instructions. Some include separate resin, hardener, and filler components.
They can solve specific compatibility problems, including certain moisture-sensitive stones or resin-backed materials. LATICRETE’s LATAPOXY 300, for example, identifies those applications among its intended uses. That does not make epoxy the default choice for ordinary residential tile. (5)
Confirm the exact tile or stone, its backing, the substrate, and the adhesive manufacturer’s requirements. Pay attention to mixing proportions and cleanup while the material remains workable. Do not assume a product sold as epoxy grout is also approved as a setting adhesive.
How to Choose for Your Tile and Installation
A useful selection sequence is tile first, bonding surface second, and exposure third. Resolve all three before comparing convenience or price.
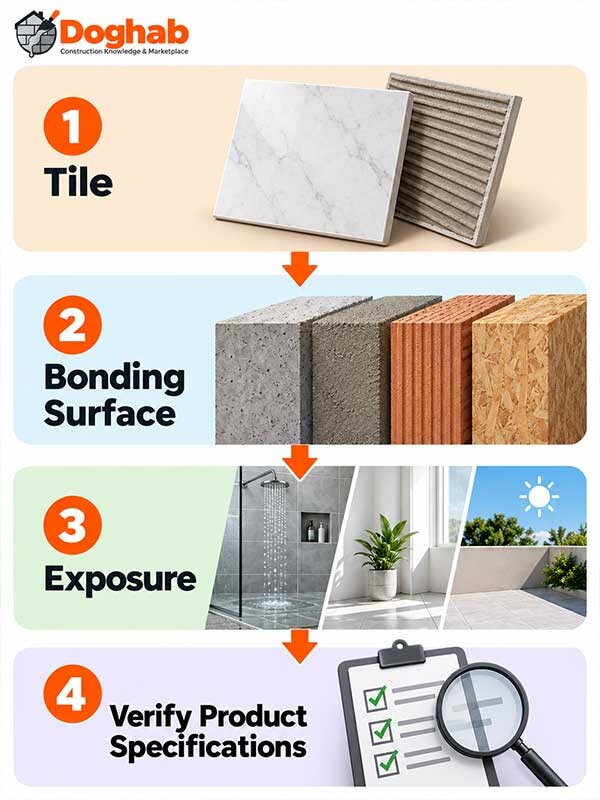
1. Identify the Tile and Its Backing
Record the material, dimensions, thickness, and any coating or mesh on the back. Keep the tile manufacturer’s installation instructions with the adhesive specifications.
Ceramic and porcelain: Confirm that the exact mortar or adhesive lists your tile and its size. Porcelain suitability alone does not establish approval over every membrane or substrate.
Large tile and planks: Consider support, permitted mortar thickness, and the ability to achieve adequate contact beneath the tile. A product’s non-sag or LHT designation may be useful, but the supporting surface still needs appropriate preparation.
Glass: Check the glass manufacturer’s requirements for adhesive type, color, backing, and installation method. Clear or translucent tile can reveal the setting material underneath; changing from gray to white does not resolve every compatibility issue.
Natural stone and resin-backed tile: Identify the actual material. Some stones can react to moisture, while a resin backing can change the bonding requirements. Obtain a product-specific recommendation when the tile instructions do not clearly identify a suitable adhesive. (5, 6)
If you are still choosing the finish, our guide to types of tile explains how material and format affect the project.
2. Identify the Surface the Adhesive Will Actually Touch
“The floor is concrete” is incomplete if the tile will bond to a membrane over that concrete. The adhesive must suit the immediate bonding surface as well as the assembly.
Common situations need different checks:
Concrete: Confirm its condition, preparation, and compatibility with the chosen product. Paint, sealers, curing compounds, or contamination can interfere with bonding.
Backer board: Follow the board manufacturer’s instructions for joints, fasteners, and setting materials.
Waterproofing or uncoupling membrane: Use an adhesive accepted for that exact membrane and tile combination.
Plywood: Verify that the specified installation method permits direct bonding and that the mortar lists the required plywood application.
Existing tile: Confirm that an overlay is appropriate and that the adhesive manufacturer provides a preparation method for the existing surface.
A stronger adhesive cannot make a loose, contaminated, or unsuitable supporting assembly reliable. Resolve the surface condition before selecting a product on bond-strength claims alone. (6)
3. Match the Actual Exposure
Room names can be misleading. A bathroom backsplash, shower wall, shower floor, and steam enclosure do not have identical demands.
| Project | What needs explicit confirmation |
|---|---|
| Dry interior backsplash | Wall substrate, tile material, tile size, and adhesive drying requirements |
| Interior porcelain floor | Porcelain approval, supporting assembly, required contact, and traffic schedule |
| Shower wall or floor | Exact waterproofing compatibility and approval for that location |
| Exterior tile | Exterior exposure, climate conditions, substrate, and complete installation method |
| Heated floor | Compatibility with the heating system and its installation and startup instructions |
Use these as screening questions, not automatic product recommendations. A match in one column does not resolve the rest of the assembly.
4. Resolve Special Requirements Before Buying
Some projects need a written technical recommendation rather than a general product-category answer. Examples include unusual tile backings, moisture-sensitive stone, steam exposure, or components whose instructions appear to conflict.
Send the manufacturer the actual tile information, substrate, membrane, location, and proposed product. Asking whether a mortar is “good for bathrooms” leaves too many variables unresolved.
Modified vs. Unmodified: Follow the Complete System
The rule “modified is always better” is too broad. So is “all membranes require unmodified mortar.”
Schluter, for example, permits its SET, ALL-SET, and FAST-SET mortars over its listed boards and membranes. That includes specifically formulated modified mortars. Its approval should not be extended to every other modified mortar. (7)
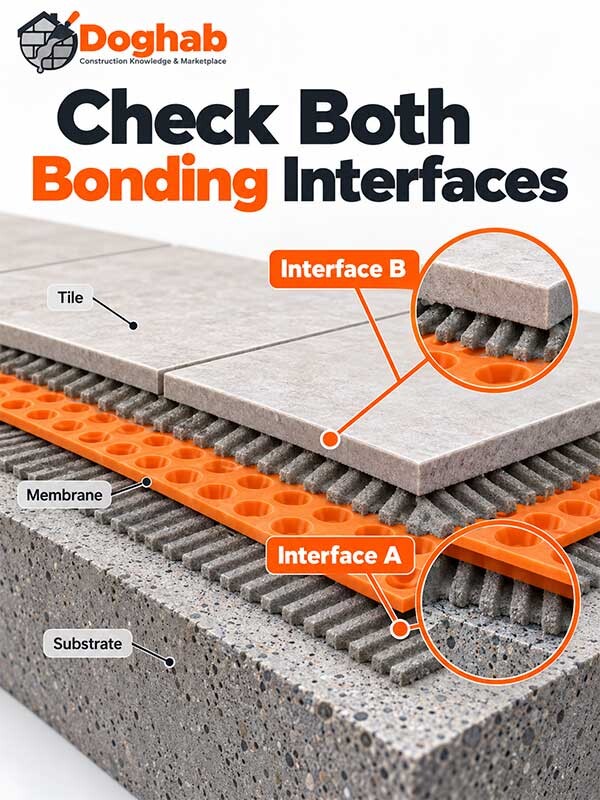
For a membrane installation, check each bonding interface separately:
The material used to install the membrane over the substrate.
The material used to install the tile over the membrane.
Those requirements may differ. Also check the tile manufacturer’s instructions; a membrane recommendation does not erase a tile-specific limitation.
When instructions conflict, obtain clarification for the complete combination before installation. Buying a more expensive bag does not resolve conflicting specifications.
For the surrounding shower assembly, see our guide to shower waterproofing systems and common failures.
What ANSI Numbers Tell You
U.S. technical data sheets often identify an adhesive by its ANSI classification. These references help distinguish material categories and performance requirements. They are not a universal compatibility chart. (8)
| Reference | Category identified |
|---|---|
| ANSI A118.1 | Dry-set cement mortar |
| ANSI A118.4 | Modified dry-set cement mortar |
| ANSI A118.11 | Exterior-glue-plywood latex-Portland cement mortar |
| ANSI A118.15 | Improved modified dry-set cement mortar |
| ANSI A136.1 | Organic adhesive |
| ANSI A118.3 | Chemical-resistant, water-cleanable tile-setting and grouting epoxy |
A118.11 does not mean the product can bond to any wood-based panel. “Exterior glue” describes the plywood category; it does not independently approve an exterior installation.
Likewise, an A118.15 classification does not settle membrane compatibility, stone sensitivity, or the suitability of a particular substrate. Read the approved uses and limitations alongside the standard.
Read the Technical Data Sheet Before Comparing Prices
The front label helps identify a product. The technical data sheet determines whether it belongs in your project.
Check these items together:
- Approved tiles and substrates: Include the tile backing and any intervening membrane.
- Locations and exclusions: Interior, exterior, wet, submerged, steam, or heated applications.
- Tile-size and thickness limits: Especially for premixed adhesives and heavier tile.
- Mixing requirements: Water or additive, measured quantities, mixing, resting, and remixing.
- Working and curing times: Separate installation time from permission to grout, walk on, or wet the surface.
- Coverage and storage: Expected yield, shelf life, and required storage conditions.
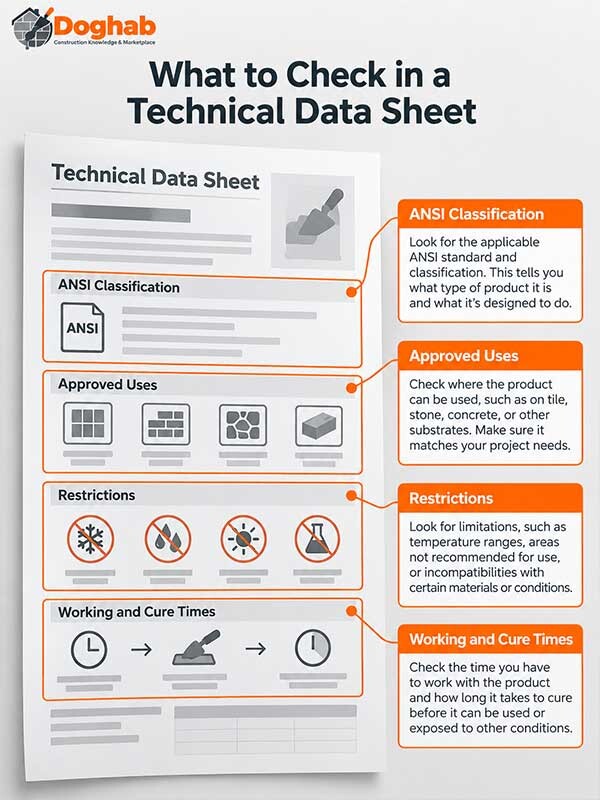
Use the current document for the exact product and market. Similar names within one brand can refer to different formulations.
Compare the cost of the quantity required for an approved installation. Bag weight alone is a poor basis for comparison because product yields differ.
Estimating How Much You Need
Use the product’s coverage chart for the proposed trowel and installation, then allow for the actual job conditions.
For a simple illustration, if an installation covers 180 square feet and the selected product is expected to cover 45 square feet per bag, the starting calculation is four bags. That is before any project allowance for waste or additional consumption.
Those figures are an example, not a product specification. Back-buttering, surface variation, and membrane geometry can affect consumption. Do not spread mortar too thin to make a purchase estimate work.
Pot Life, Open Time, and Cure Time Are Different
A mortar can still be workable in the bucket while material spread earlier has become unsuitable for setting tile.
The relevant terms describe different stages:
- Pot life: The usable working period of mixed material in the container under the stated conditions.
- Open time: The available period after spreading during which tile can be embedded with the required bond.
- Adjustment time: The period during which a newly placed tile can be repositioned as permitted.
- Cure or readiness time: The wait before a specified next activity, such as grouting, traffic, or water exposure.
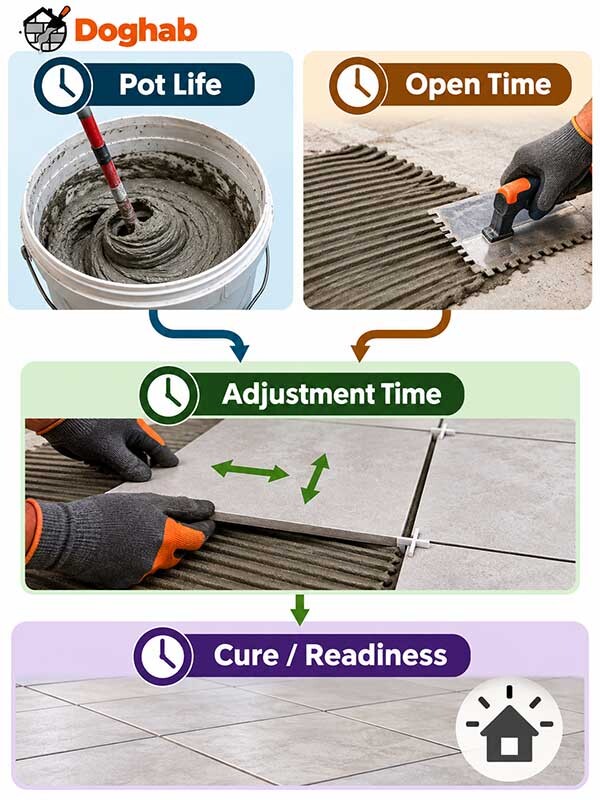
Do not substitute one for another. A published pot life does not mean you can leave mortar spread on a floor for that same period.
Site conditions matter. Heat and drying conditions can shorten workable time; published values are not a guarantee under every condition. Spread only an area you can tile appropriately, and follow the product’s instructions if the surface skins over. Do not add water to revive mortar that has exceeded its usable condition. (2, 6, 9)
Rapid-setting products also need a realistic work plan. A faster return-to-service schedule is useful only if the installer can mix, place, adjust, and clean within the product’s working limits.
Coverage Matters as Much as Product Selection
Mortar coverage means the contact achieved beneath the tile. It is different from the square feet a bag will cover.
For ceramic and porcelain installations, CTEF describes minimum mortar-contact requirements of 80% in dry areas and 95% in wet or exterior areas. Support must be distributed appropriately; a large unsupported area is not made acceptable by concentrating mortar elsewhere. Follow any stricter requirements for the selected tile and assembly. (10)
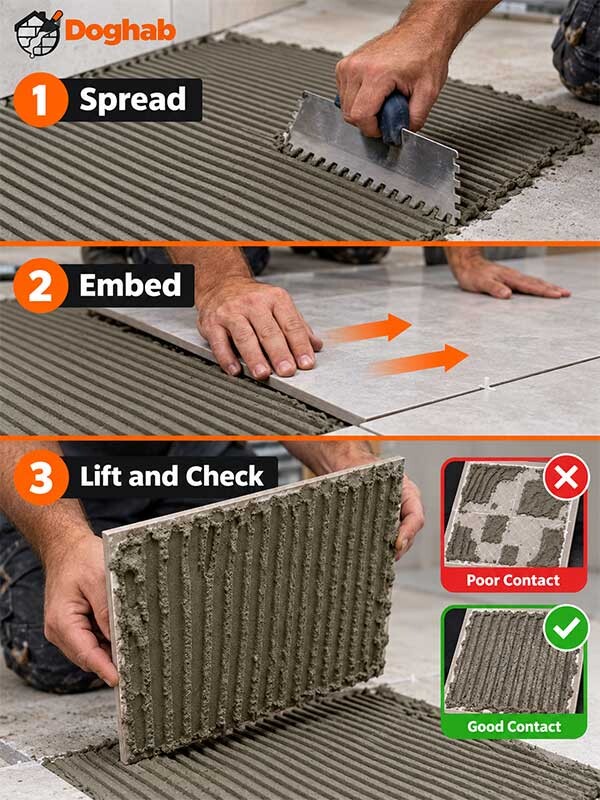
Trowel size alone does not prove that contact has been achieved.
Directional troweling creates parallel ridges that can collapse as the tile is embedded across them. Periodically lifting a freshly installed tile reveals the actual transfer and remaining voids. Adjust the method while the installation is still accessible. (11)
Back-buttering—a coat of mortar applied to the tile’s back—may help achieve the required contact. It does not remove the need to check the result.
For conventional thinset installation, avoid substituting isolated blobs of mortar for the specified bedding method. A tile that looks level from above can still have significant unsupported areas underneath. (12)
Common Selection and Installation Failures
These are problems to prevent or investigate, not a ranking of failure frequency.
Selecting by the front label alone. “Tile adhesive” or “premixed thinset” does not establish material type or permitted use. Check the technical classification and exclusions.
Ignoring the actual bonding surface. Approval over cement board does not automatically extend to a membrane coating that board.
Using mortar to compensate for poor preparation. Bonding material does not correct an unstable assembly, and extra thickness may exceed its permitted use.
Mixing by feel or changing the formula. Extra water or an unapproved additive can change how a product performs. Measure and follow the specified sequence.
Spreading more than can be tiled in time. Material may skin over before the installer reaches it, reducing effective transfer.
Checking appearance without checking contact. Straight joints and a flat-looking finish do not reveal the bond underneath.
Returning the installation to use too early. Readiness for grouting, foot traffic, heavy loads, and water exposure can involve different waiting periods.
If an installed tile is loose or a floor develops a hollow sound, do not select a repair solely from that symptom. The investigation may need to consider the supporting assembly, adhesive compatibility, contact, movement, and curing history.
Questions to Settle Before Installation
Before work begins, you or your installer should be able to identify:
The exact tile, including its backing and any special installation requirements.
The surface directly beneath the setting material.
The adhesive product and the instructions supporting that combination.
Any membrane or heating-system requirements.
The method for checking mortar contact during installation.
The schedule for grouting, traffic, and water exposure.
Keep the product information and photographs of the work before it is concealed. They provide a more useful record than a receipt that lists only “tile adhesive.”
Sources and Scope
Reviewed September 25, 2026. This guide covers adhesive selection for residential tile installations in the United States. Product examples illustrate documented differences; they are not comparative product tests or endorsements.
Schluter — Modified and unmodified thin-set mortar FAQ.
CUSTOM Building Products — ProLite Premium Large Format Tile Mortar, product information and TDS-114.
CUSTOM Building Products — AcrylPro Professional Tile Adhesive, technical data sheet.
CUSTOM Building Products — SimpleSet Pre-Mixed Thin-Set Mortar, TDS-182.
LATICRETE — LATAPOXY 300 Adhesive, product information and DS-633.
LATICRETE — Planning a Job: Thinsets FAQs.
Schluter — Approval of ALL-SET and FAST-SET over Schluter boards and membranes.
Tile Council of North America — ANSI Standards.
Schluter — ALL-SET product information and working properties.
Ceramic Tile Education Foundation — Never Assume You Have Sufficient Mortar Coverage. Check It.
Ceramic Tile Education Foundation — How to Correctly Trowel Mortar When Installing Tile.
Ceramic Tile Education Foundation — Why You Need to Eliminate Spot Bonding When Installing Ceramic Tile.